

A basement microgreens business can start small and still feel like a real operation fast. With a few shelves, the right lighting, and a consistent routine, many growers aim for monthly income anywhere from $3,000 to $20,000, depending on how much space they use, how well they sell, and how efficiently they run trays week to week. The best part is that microgreens are built for quick turnaround. Most varieties can be harvested in 7 to 21 days, which keeps cash moving instead of waiting months for a crop.
This guide walks you through the full setup and workflow so you can grow clean, sell confidently, and scale without chaos. The goal is not to “grow a little green in the corner.” The goal is to build a repeatable system that produces consistent harvests your buyers can rely on.
Cost, Revenue, and Profit Potential in a Basement Microgreens Business
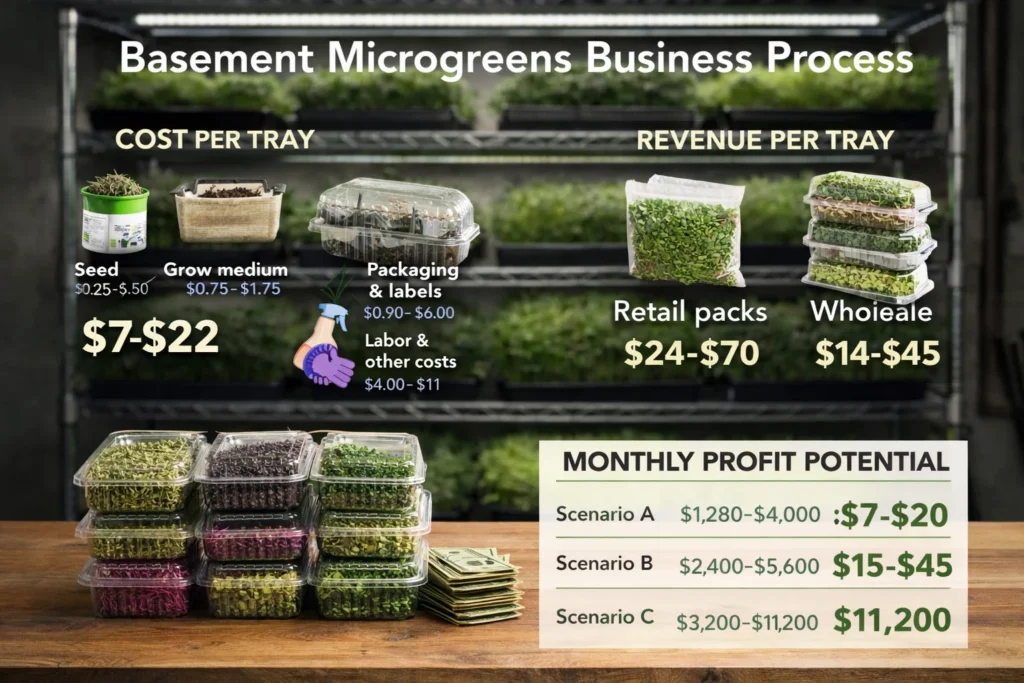
A basement microgreens business is basically a “per tray” business. If you know what one tray costs you, what one tray earns, and how many trays you can harvest each week, you can estimate revenue and profit without guessing. Most basement growers work with standard 10×20 trays and build a weekly harvest rhythm, because weekly customers are easier to keep than random one-off buyers.
Typical cost per 10×20 tray
Costs are split into variable costs and fixed costs. Variable costs change with every tray you grow, while fixed costs are things like rack setup, lights, dehumidifier, and basic tools that get paid back over time.
For variable costs, a realistic planning range per tray looks like this. Seed usually runs about $0.25 to $4.50, depending on the crop, with sunflower and peas on the low end per ounce,e but higher sow weights, and herbs on the higher end. Growing medium commonly adds $0.75 to $1.75 per tray. Packaging and labels often add $0.90 to $3.50 per tray for wholesale-style packing, or $1.80 to $6.00 per tray if you pack into multiple retail clamshells. Electricity and water often cost around $0.25 to $1.20 per tray, higher for slower crops that sit under lights longer.
Cleaning supplies and gloves usually add $0.10 to $0.35. Labor is the big one: if you count a realistic 15 to 25 minutes total hands-on time per tray and value your time at $15 to $20 per hour, labor often lands around $4.00 to $8.50 per tray. Add a small waste and overhead allowance, often $0.75 to $2.50 per tray, because every grower has occasional trays that underperform, get discounted, or need extra trim.
When you total that, a common all-in variable cost range is about $7 to $18 per tray for a smooth wholesale workflow, and about $8.50 to $22 per tray for a retail clamshell workflow. Faster brassicas usually sit lower, slower herbs often sit higher.
🌿 Recommended Microgreens Supplies |
Typical selling prices and revenue per tray
Microgreens usually sell either by the ounce in retail packs or by the pound in wholesale. Because variety and channel change pricing a lot, it helps to use simple ranges.
For wholesale to restaurants, many growers land around $1.25 to $3.50 per ounce, depending on the crop and the market, with mild greens often lower and colorful or spicy varieties higher. For retail clamshells, many sellers price around $4 to $10 per 2 o,z depending on branding and the variety mix. Yield also matters. A strong tray might produce anywhere from 6 to 20 oz, depending on the crop, with sunflower and pea shoots typically heavier, and herbs typically lighter.
If you combine typical yields with typical pricing, you often see tray revenue ranges like this. A heavier tray sold wholesale might bring $18 to $45. A lighter specialty tray sold wholesale might bring $14 to $35. Retail clamshell trays can gross more, often $24 to $70, because the price per ounce is higher, but only if you consistently sell through and do not discount old inventory.
Net profit per tray and what drives it
Net profit is simply total revenue minus all variable costs, and then you subtract a share of fixed monthly costs. On a well-run system, realistic net profit ranges often look like this.
Wholesale trays often net around $5 to $25 per tray, with lower profits on low-priced mild greens and higher profits on colorful, spicy, or premium mixes. Retail trays often net around $10 to $45 per tray, mainly because retail pricing can lift revenue, but you trade that for more time packing, higher packaging costs, and a higher risk of waste if you overproduce.
The biggest drivers of profit are not “finding the cheapest seed.” The biggest drivers are yield consistency, time per tray, pricing confidence, and sell-through speed. A business that avoids waste and keeps labor tight usually beats a business that chases fancy varieties but loses trays and spends too long packing.
Monthly profit potential with simple baseline scenarios
To estimate monthly potential, start with how many trays you can harvest weekly. A practical basement rack example is a 4-foot-wide rack with 5 shelves, fitting about 4 trays per shelf, which equals about 20 trays per rack. Two racks give you 40 trays of active capacity. If you run a weekly harvest rhythm, you might harvest roughly that many trays per week once you have a steady rotation.
Scenario A, wholesale focused: 40 trays harvested per week equals about 160 trays per month. If your average net profit is $8 to $18 per tray after variable costs and a realistic labor estimate, the monthly profit potential lands around $1,280 to $2,880. If you raise the average profit per tray by improving pricing and consistency to $15 to $25, the same capacity can land around $2,400 to $4,000.
Scenario B, mixed channel with retail packs: still 160 trays per month, but the average net profit is higher if you sell through well, often $15 to $35 per tray after packaging and extra time. That puts the monthly profit potential at around $2,400 to $5,600. Some growers can push beyond that when they have strong retail placement and almost no waste, but the moment clamshells sit unsold, profits drop quickly.
Scenario C, higher scale basement setup: four racks equals about 80 trays active, which can become about 320 trays per month at a weekly harvest pace. At $10 to $25 net per tray, that’s roughly $3,200 to $8,000 per month. At $20 to $35 net per tray in a strong retail mix, that can move toward $6,400 to $11,200 per month. Hitting those numbers requires solid systems, consistent buyers, and controlled losses.
A realistic way to track your numbers from week one
If you want this to feel “pro” quickly, track three numbers every week. Cost per tray, revenue per tray, and minutes spent per tray. When you reduce tray minutes, profit climbs even if pricing stays the same. When you improve sell-through and reduce waste, profit climbs without increasing production. Those two levers matter more than almost anything else.
If you tell me your basement capacity, like how many racks you plan to run and whether you want wholesale, retail, or mixed sales, I can plug in a realistic tray count and build you a simple monthly projection with best-case, normal-case, and conservative-case numbers.
Setting Up Your Basement: The Essential Space Requirements
Transforming your basement into a thriving microgreens business doesn’t require a lot of space. Even a modest 100 to 200 square feet can provide ample room for growing a variety of microgreens. The key to success lies in how you utilize the space, ensuring you have the proper systems in place for airflow, lighting, and temperature control.
The first step is to assess the conditions in your basement. Is it dry or prone to humidity? Do you need additional lighting, or can you rely on natural light? Once you understand the space, you can set up your growing area. You’ll need shelving racks to hold your trays of microgreens, as well as plenty of space to move around while planting and harvesting.
Lighting is one of the most important elements to consider. Microgreens need a good light source to thrive. Fluorescent lights are a popular and affordable choice. They are an excellent option for a basement setup because they don’t require the same power usage as grow lights, yet they provide enough intensity for proper growth. With a well-lit area, you’ll be able to grow your crops consistently throughout the year, regardless of external weather conditions.
Additionally, proper temperature and humidity control are essential. Microgreens thrive in moderate temperatures (around 70-75°F) and high humidity. Without a humidity system in place, you risk your crops drying out, leading to poor yields. Using fans to circulate air and dehumidifiers to maintain the right moisture levels can make a big difference in maintaining optimal conditions.
Choosing the Right Growing Medium and Equipment
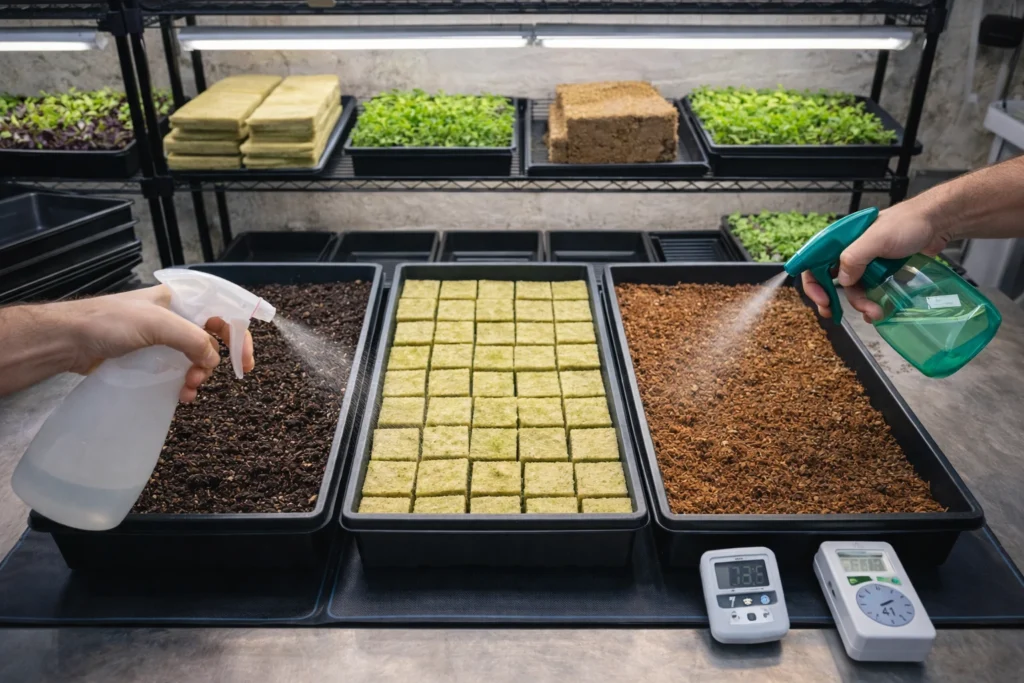
One of the first decisions you’ll make when setting up your basement microgreens business is choosing the right growing medium. While traditional soil is an option, many microgreens farmers prefer soilless growing mediums, such as Rockwool or coco coir. These materials are sterile, meaning they reduce the risk of contamination and disease, which is especially important when growing microgreens for restaurants or consumers who expect a clean, safe product.
Rockwool, in particular, is favored by many because it retains moisture effectively while providing good drainage. This balance helps microgreens grow faster without becoming waterlogged. The fact that Rockwool is also easy to handle and does not require washing after planting makes it ideal for busy operations. In addition, the ability to grow microgreens in containers, rather than in traditional soil, means less mess and easier cleanup.
As for equipment, you’ll need to invest in a few basic items to get started. Growing trays (usually 2-inch deep) are essential for holding your medium and seeds. You’ll also need a temperature-controlled mat for germinating your seeds, as well as spray bottles for watering. While some farmers choose to automate their watering systems, starting with manual misting is often sufficient for a small-scale operation.
While large-scale farms might invest in advanced irrigation or automated systems, simplicity and efficiency should be the focus in the early stages. Hand watering with a spray bottle ensures the right amount of moisture is applied and allows you to monitor each tray individually for signs of health or stress.
Selecting the Best Microgreens to Grow
When it comes to growing microgreens, the right selection of varieties will significantly impact your business’s success. Some microgreens are easier to grow and have a faster turnover, which is ideal for meeting the demand from restaurants and customers. Others are valued for their unique flavors, colors, and textures, making them a preferred choice for gourmet chefs and health-conscious consumers.
Popular microgreens that perform well in a basement setup include radishes, peas, sunflowers, and amaranth. Radishes are particularly quick growers, with some varieties ready for harvest in just 7–10 days. Pea shoots, another common choice, typically grow in about 10 days and are valued for their fresh, crunchy texture and mild flavor.
More specialized microgreens like shiso, red vein sorrel, and black mint can differentiate your business by offering unique flavors. Red vein sorrel has a tangy, lemony flavor, while shiso provides a peppery, aromatic taste. These types of microgreens are highly prized by chefs who want to elevate their dishes with fresh, high-quality garnishes.
It’s also important to think about the market demand. While chefs and restaurants may be after unique flavors and textures, home consumers may gravitate toward more familiar greens like kale or sunflower shoots. Having a diverse range of microgreens allows you to cater to both groups, ensuring a broader customer base and increasing your chances of success.
Planting and Growing Process: From Seed to Harvest
Starting a basement microgreens business means understanding the growing process from start to finish. Sowing seeds densely on your growing medium is the first step. You want to ensure that the seeds are spread evenly, allowing for maximum coverage and optimal growing conditions. Don’t bury the seeds too deeply; instead, gently press them into the surface of the medium, ensuring good seed-to-soil contact.
After planting, place the trays under a covering dome or in a dark area to help the seeds sprout. For about 3–4 days, the seeds need to remain in a moist, warm environment, which encourages strong germination. Once the seeds begin to sprout, usually within 5–7 days, remove the dome and place the trays under fluorescent lights for continued growth. At this stage, the microgreens will require light but not direct sunlight.
As they begin to grow, it’s important to water regularly to keep the medium moist but not soggy. Microgreens typically take 7–14 days to reach the true leaf stage—when the first set of leaves develops, signaling that they’re ready to harvest. For some varieties, such as radishes, you may see results in as little as 7 days. Others, like shiso, may take longer to reach full maturity.
Harvesting microgreens is relatively simple: once the leaves are fully developed, you can cut them just above the soil line. Freshness is key, so it’s crucial to harvest only as much as needed and get your product to market quickly. Many operations use biodegradable containers to package their microgreens, ensuring they remain fresh and are environmentally friendly.
🌿 Recommended Microgreens Supplies
These are the tools and supplies I personally recommend for growing healthy and flavorful microgreens at home.
As an Amazon Associate, I earn from qualifying purchases.
Packaging and Storing Your Microgreens for Freshness
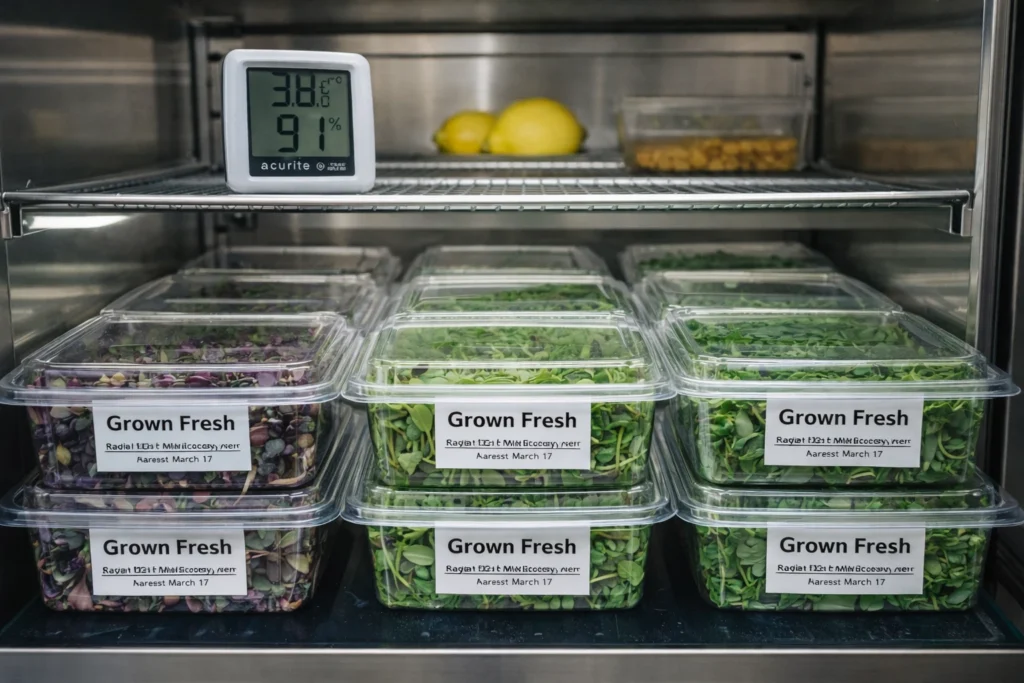
After harvesting your microgreens, it’s cr .ucial to focus on packaging and storing them correctly to maintain their freshness and ensure they reach customers in top condition. Microgreens are delicate, and their shelf life is shorter than that of fully grown vegetables. However, with proper handling, they can stay fresh for up to 10 days, depending on the variety.
Packaging plays an essential role in maintaining freshness. It’s vital to use biodegradable or compostable containers, which not only keep the microgreens fresh but also align with eco-friendly values that many consumers and restaurants prioritize. Plastic clamshell containers are commonly used in the industry, but alternatives like corn-based containers are growing in popularity due to their environmentally friendly nature. These containers provide the perfect environment for microgreens to stay hydrated and intact.
Once packaged, storing the microgreens at the right temperature is important. Typically, microgreens should be stored in a cool, dry place. The best practice is to refrigerate them, but not in conditions that are too cold, as that can stunt their freshness. A refrigerator set to around 40°F (4°C) ensures that they remain crisp and flavorful until they are ready to be used.
For long-term storage, the key is to harvest only what is needed and deliver quickly to ensure maximum shelf life. Some businesses, like Micro Acres, have optimized their delivery schedules to ensure customers receive fresh product regularly, reducing the risk of spoilage. If you’re working with a subscription model, having a reliable and well-planned delivery system is essential to ensure your microgreens reach customers as fresh as possible.
Storage tips:
- Always harvest microgreens when they reach their true leaf stage for optimal flavor.
- Use biodegradable packaging to preserve freshness and offer eco-friendly products.
- Keep refrigerated in a humidity-controlled space to extend shelf life.
- Avoid overpacking containers, as this can crush delicate greens.
Marketing Your Microgreens Business
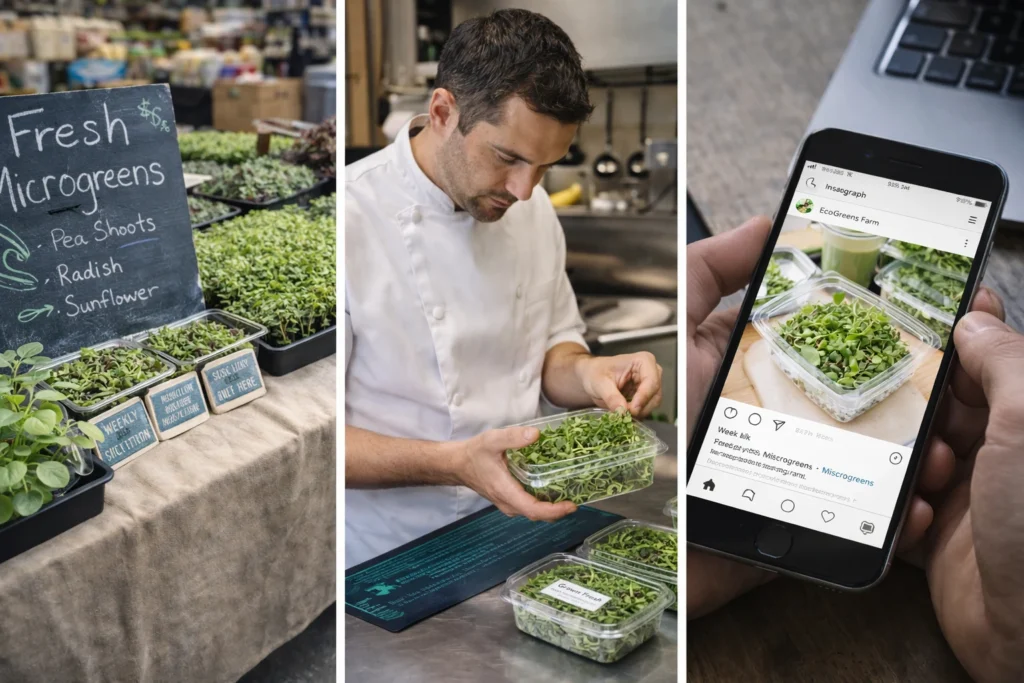
Once you’ve set up your growing operation. And are producing high-quality microgreens, the next step is marketing your product. Microgreens are niche, high-value crops, and understanding how to reach your target audience—whether it’s chefs, restaurants, or home consumers—can make or break your business.
Building a brand is essential to differentiating your microgreens from others on the market. Your brand should emphasize freshness, quality, and the unique value of your product. For example, if you’re growing unique varieties like red vein sorrel or shiso, make sure to highlight their flavor profiles and uses in your marketing materials. This can attract chefs looking for specialized ingredients or health-conscious customers seeking new additions to their meals.
Social media is an invaluable tool for marketing your microgreens. Platforms like Instagram and Facebook allow you to showcase your growing process, share behind-the-scenes looks at your farm, and engage with customers. These platforms are perfect for creating a local community around your microgreens, especially if you are targeting restaurants or local food markets. Use visually appealing photos of your microgreens in vibrant dishes, and leverage relevant hashtags like #microgreens or #urbanfarming to reach potential customers.
In addition to social media, consider building relationships with local chefs and restaurants. Many chefs are eager to support local farmers and incorporate fresh, seasonal produce into their dishes. If you can introduce chefs to the unique flavors and health benefits of your microgreens, you may be able to secure regular orders. Offering free samples or arranging tasting sessions can also help chefs experience the flavor and quality of your products firsthand, making them more likely to purchase from you.
If you want to expand your customer base, consider offering subscription models where customers can receive fresh microgreens delivered to their door weekly or biweekly. This model has been successful for many small-scale businesses and helps generate recurring revenue. It’s also an excellent way to build a loyal customer base that appreciates the convenience of fresh, nutritious greens delivered directly to their home.
Marketing strategies:
- Create a compelling brand that highlights your microgreens’ unique qualities (e.g., fresh, local, unique varieties).
- Use social media (Instagram, Facebook) to showcase your farm and connect with customers.
- Build relationships with local chefs to ensure regular restaurant orders.
- Consider offering subscriptions to make it easy for consumers to receive your product regularly.
Scaling Your Microgreens Business: Taking It to the Next Level
Once you’ve established a steady income and a reliable customer base, it’s time to consider scaling your business. Scaling a basement microgreens operation requires careful planning, investment, and system improvements to maintain product quality as production increases.
The first step in scaling is space expansion. If your basement space is already being utilized efficiently, you may want to consider renting additional space or expanding vertically by using stacked shelves. This allows you to maximize your growing area without increasing the footprint of your operation. Adding more shelving racks and adjusting your airflow and lighting setup will help you grow more crops without sacrificing quality.
Next, automating certain tasks can increase efficiency. While hand-watering and manual harvesting may be sufficient in the beginning, investing in an automated irrigation system or watering trays will allow you to scale up without increasing labor costs. Additionally, you can look into investing in LED grow lights for more controlled lighting conditions, allowing you to increase the growing capacity even further.
As production grows, it’s essential to develop a distribution plan to manage increased orders. You may want to hire staff or outsource some tasks, such as packaging and delivery, to keep up with demand. Expanding into wholesale markets or partnering with larger grocery chains or food distributors may be the next step if you want to take your business to a broader audience.
Scaling tips:
- Expand vertical space by adding shelving and adjusting your layout for maximum efficiency.
- Invest in automated watering systems and LED grow lights to improve production.
- Develop a distribution plan to handle increased orders and scale efficiently.
The Potential for Success
Starting a microgreens business in your basement offers immense potential for profitability and growth. With minimal investment and a bit of space, you can grow a wide variety of microgreens, cater to local restaurants, and even offer direct-to-consumer sales. By focusing on the right setup, maintaining high standards for quality, and marketing effectively, your basement farm can evolve into a profitable business.
The success of businesses like Micro Acres proves that it’s possible to turn a small operation into a thriving business with the right strategy. As demand for fresh, locally grown produce continues to grow, there’s never been a better time to get started. Take the first step today, and watch your basement microgreens business flourish.