
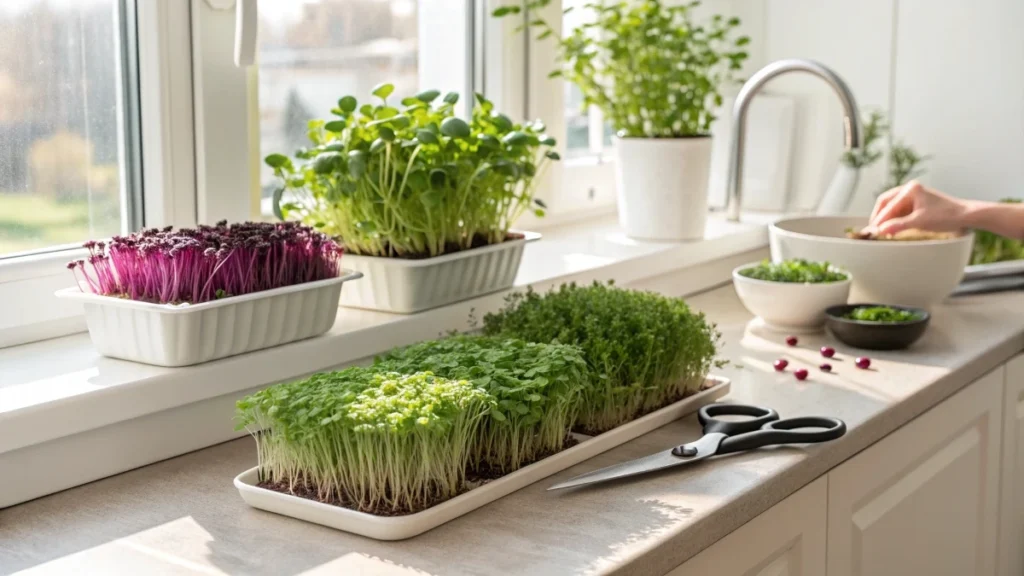
Growing your own greens can be simple, fast, and seriously satisfying. This guide to the best microgreens to grow at home shows you which varieties deliver flavor, yield, and nutrition without fancy equipment or a dedicated grow room.
Microgreens are young seedlings harvested early, usually in about 7 to 21 days. Wide varieties can be more nutrient-dense than their mature counterparts, but the real win at home is freshness: you cut them minutes before eating, when texture and aroma are at their peak.
You’ll learn the easiest microgreens for beginners, including broccoli, pea shoots, radish, sunflower, basil, and cilantro, plus the setup that keeps trays consistent on a windowsill or under lights. We’ll also cover seed choices, blackout timing, bottom watering, harvest cues, and smart storage so your greens stay crisp and clean.
Why these varieties work best at home
Home growers need microgreens that behave well in real kitchens, not just in perfect farm conditions. The best picks share four traits.
They germinate quickly and finish fast, so you can harvest weekly.
They tolerate small mistakes in watering and temperature.
Seeds are easy to find and affordable.
They taste familiar, so you actually use what you grow.
Broccoli is mild and versatile, with a popular health reputation. Pea shoots deliver a sweet crunch and generous yield. Radish brings fast color and gentle heat. Sunflower tastes nutty and feels substantial. Basil and cilantro add fragrance and can double as herbs if you transplant a few seedlings later.
🌿 Recommended Microgreens Supplies |
Top microgreens to grow at home.
Broccoli microgreens
Broccoli is the dependable anchor for beginners. The flavor is mild, so it slips into almost anything: eggs, soups, bowls, sandwiches, even burgers as a fresh lettuce swap.
Most home trays are ready around day 8 to day 12, depending on temperature and light. Broccoli also carries a strong “nutrition story” that many people already trust, which is one reason it stays popular.
Tip: if you want a steady supply, sow one tray and then sow a second tray 4 to 5 days later. That gives you staggered harvests.
Pea shoots
Pea shoots taste like fresh peas, which makes them instantly friendly for kids and adults. They are sweet, crisp, and great both raw and lightly cooked.
Expect harvest around day 10 to day 14 when they reach 5 to 6 inches. Speckled pea is a great all-around choice because it gives a balanced look with tendrils and sturdy shoots.
Tip: peas like a slightly deeper medium layer than tiny-seeded crops. Keep watering consistently, but avoid standing water in the bottom tray.
Radish microgreens
Radish is the fast win. It often goes from sowing to harvest in 7 to 10 days, and the results are obvious, which helps you dial in your routine quickly.
The flavor is peppery but usually pleasant rather than harsh. Purple stem varieties like Rambo or Triton look especially striking and make simple plates look “finished” without effort.
Tip: because radish is dense and thirsty, water consistently and do not overcrowd the tray. Better airflow equals better shelf life.
Sunflower microgreens
Sunflower gives thick stems, big leaves, and a juicy crunch with a lightly nutty taste. It feels hearty, more like a vegetable than a garnish.
It does take more hands-on work than broccoli or radish. You’ll deal with seed hulls, and germination can be slower. Most trays are ready around day 9 to day 12, depending on your method.
Tip: after emergence, gently brush the canopy once a day to encourage hulls to release. A little airflow helps a lot.
Basil microgreens
Basil microgreens smell incredible. That aroma alone makes them worth growing. The flavor is sweet and fragrant and shines on pizza, pasta, tomatoes, fruit, and soft cheeses.
Basil tends to like warmth and steady moisture. Harvest timing varies, but many home growers cut basil microgreens in the 12 to 20-day range depending on variety and conditions.
Tip: tiny seeds go far. A small packet can last many trays.
Cilantro microgreens
Cilantro adds a bright herbal punch to tacos, curries, rice bowls, soups, and salsas. It’s one of the most useful “daily cooking” microgreens because a small handful changes the whole dish.
Cilantro can be a bit slower than broccoli or radish. Many trays land around day 14 to day 21, depending on temperature and how you pre treat seed.
Tip: If you love cilantro, plant two trays on different weeks so you always have one coming on.
Setting up your home microgreens station
You can grow great microgreens with a very simple setup.
Trays: one tray with drainage holes nested inside a solid tray
Medium: a clean seed starting mix or coco coir
Light: sunny window or a basic grow light
Tools: spray bottle for early days, scissors for harvest
Fill your tray with a shallow, even layer of medium. Smooth it. Pre-moisten so it feels evenly damp, not muddy. Sow seeds densely, then press lightly so seeds make good contact.
Blackout timing
A short blackout helps many crops germinate evenly and root well.
A simple rule: cover for 24 to 48 hours, then uncover as soon as most seeds have sprouted and are pushing upward. Leaving trays covered too long can lead to weak, pale growth.
Light options
If you have strong sunlight, a south-facing window can work. Rotate trays daily for even growth.
If light is inconsistent, a grow light is easier. Aim for about 12 to 14 hours a day. Keep the light close enough to prevent stretching, and raise it as the canopy grows.
Airflow and cleanliness
Airflow is a quiet hero. Give trays space, wipe spills, and keep the area tidy. Most beginner problems trace back to stale, wet conditions more than anything else.
Watering, harvesting, and storage
Bottom watering
Once roots reach the bottom, switch to bottom watering.
Add water to the solid tray, let the medium wick for about 5 to 10 minutes, then pour off excess. The goal is a moist medium with a dry canopy.
Watering frequency is usually every 1 to 2 days, but it depends on your room and your light.
Harvest cues
Harvest when the color looks rich and stems feel crisp.
For most varieties, the sweet spot is when cotyledons are open, and the first true leaf is just starting to show. If you wait too long, stems can get stringy and flavors can turn sharper.
Cut just above the medium with clean scissors. Shake gently to drop loose hulls.
Storage that keeps them crisp
Store microgreens dry, cold, and not compressed.
Use a container with a paper towel to catch condensation. Keep it in the fridge, ideally toward the front where temperatures stay stable. Most microgreens can hold about 7 to 10 days when stored dry, but they taste best in the first few days.
Cost and seed sourcing tips
Start with small packets for testing. Once you know what you love, buy bulk for staples like peas and sunflowers because those use more seed per tray.
Keep seeds cool, dry, and sealed. Label containers with dates and rotate stock so older seed gets used first.
If a sunflower lot produces stubborn hulls or weak stands, switch lots instead of fighting it. Seed quality shows up in the tray immediately.
Easy ways to use homegrown microgreens
Use microgreens like a finishing ingredient.
Broccoli: eggs, soups, burgers, bowls
Radish: tacos, avocado toast, creamy dressings, sushi bowls
Pea shoots: salads, stir fries, wraps, pasta with lemon
Sunflower: sandwiches, grain bowls, hummus plates
Basil: pizza, pasta, tomatoes, fruit, quick pesto
Cilantro: tacos, curries, rice, soups, salsa
A simple entertaining trick: harvest at the counter and sprinkle a mixed handful right before serving. It looks fresh, smells amazing, and makes food feel special without extra cooking.
Troubleshooting for beginners
Leggy, pale growth: light is too weak or too far away
Slimy surface or algae: too much top watering or poor drainage
White fuzz: could be root hairs. Mist lightly. If it disappears, it’s the root hairs. If it spreads and smells off, improve airflow and reduce moisture
Patchy germination: uneven moisture during blackout, old seed, or uneven surface
Bitter or harsh flavor: harvested too late. Cut earlier for tender texture.