
Deep purple leaves, a clove-like aroma, and a slightly spicy bite make purple basil microgreens one of the most exciting herbs you can grow at home.
In this guide, you’ll learn how to grow purple basil microgreens from seed using a warm 25 to 30°C range, a simple organic potting mix, and a moisture routine that keeps seedlings strong instead of stressed. You’ll also see how a few mature plants and cuttings can keep a steady basil supply going, so you’re not starting from scratch every time.
By the end, you’ll know how to grow, harvest, and actually use purple basil microgreens week after week.
Understanding purple basil microgreens
What makes purple basil different
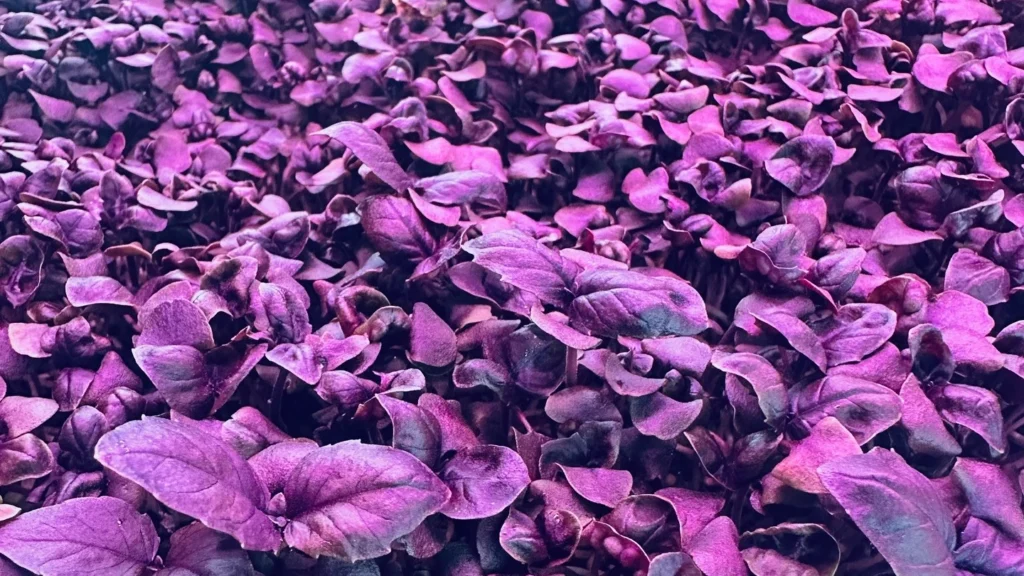
Purple basil isn’t just green basil with a new paint job. The mature plant develops deep purple leaves, purple stems, and often tall flower spikes. Even as microgreens, that pigment starts showing early, especially once the seedlings settle under good light.
The taste is different, too. Compared to sweet basil, purple basil leans more toward clove and spice, with less sweetness. Harvested young, that flavor comes through in a lighter, fresher way. It adds lift and aroma without turning heavy or overpowering.
Why the microgreen stage matters
Purple basil gets woody as it matures. Microgreens avoid that problem completely. At the microgreen stage, stems are tender, leaves are soft, and the whole snip is pleasant to chew. You get color and aroma quickly, and you can grow multiple trays in the time it takes one plant to grow to full size.
That short cycle makes purple basil microgreens perfect for indoor growing and small spaces where full herb plants can feel slow or bulky.
Benefits of purple basil microgreens
Visual and flavor benefits
If you care about plating, purple basil microgreens are almost unfair. A pinch of pale pasta, creamy dips, eggs, or white fish instantly adds contrast. They look deliberate, like you planned the meal.
Flavor-wise, they’re aromatic with a gentle spicy edge. You can use more than you’d use of mature basil without the dish tasting like pure basil. Purple basil also pairs beautifully with tomato, citrus, cheese, olive oil, and balsamic.
Practical benefits for home growers
Purple basil microgreens don’t need deep soil. A shallow tray is enough. That means you can grow them on a shelf, a balcony, or a bright window ledge.
Even better, purple basil can be kept alive long-term. You can grow a few plants to maturity and take cuttings for continuous supply, while trays provide quick harvests. It becomes a system, not a one-time project.
🌿 Recommended Microgreens Supplies |
Seed selection, germination, and ideal conditions
Choosing good seed
For microgreens, start with clean, fresh seed that’s true to type. Purple basil seed is tiny and dark, and it should look uniform with minimal debris.
If you live in an area where local purple basil varieties don’t produce reliable seed, it’s usually smarter to buy seed from a trusted supplier and use your mature plants for cuttings instead of depending on saved seed.
Ideal germination temperature and light
Purple basil likes warmth. A strong target is 25 to 30°C. In that range, germination is quicker, and seedlings are less likely to stall or rot.
Seeds do not need light to germinate, so you can cover them lightly with a mix. Just don’t bury them deep. A thin veil of soil is enough to keep moisture stable and prevent seed movement during watering.
Germination window and moisture
Expect germination in roughly 5 to 14 days, depending on warmth and consistency. The biggest success factor is the surface staying evenly moist without becoming soggy.
- If the surface dries out, tiny roots can fail fast
- If the mix stays waterlogged, seeds may rot before they ever sprout
Gentle misting beats heavy watering in the early stage.
Preparing the growing medium
A simple mix that works
Purple basil microgreens do best in a medium that holds moisture but still breathes.
A practical, balanced blend:
- one part garden soil
- One part coco peat
- one part vermicompost
This gives structure, moisture retention, and gentle nutrition without overwhelming the seedlings.
Optional additions for drainage and plant health
If you want to improve airflow and reduce compaction, add small amounts of:
- Neem cake for natural root support
- vermiculite for moisture holding
- perlite for air pockets and drainage
You don’t need all of these to succeed, but they can help, especially in humid conditions or if your base soil compacts easily.
Pre-wet and let it settle.
Fill your tray, water thoroughly until moisture reaches the bottom, and let it sit overnight if possible. This helps the mix hydrate evenly and eliminates dry pockets.
The next day, loosen just the surface slightly before sowing, so seeds land on a soft, even bed.
Sowing and early growth
Sow evenly for a clean canopy
Scatter seeds in smooth passes across the tray. Avoid clumps. Clumps trap moisture and encourage rot.
You want coverage that looks dense from above, but not piled. Even distribution is what creates that uniform “carpet” look at harvest.
Cover lightly and mist.
After sowing, dust a thin layer of mix over the seeds. Then mist gently so seeds hydrate without washing into the corners.
The surface should look dark and moist, not flooded.
Early placement and moisture care
During germination, keep the tray warm and out of harsh direct sunlight. Seeds don’t need light yet, and strong sun can dry the surface too quickly.
Moisture balance matters most here. One real risk to basil seedlings is excess water from heavy rain or uncontrolled soaking. A tray left outdoors in continuous rain can collapse fast because tiny seedlings can’t handle saturated conditions for long. Indoors or under cover, you can keep moisture consistent and avoid that loss.
Growing and caring until harvest
What healthy sprouts look like
By around a week in good conditions, you’ll see upright sprouts with paired seed leaves. Early on, many will look more green than purple. As light exposure improves, purple pigment increases.
Healthy signs:
- stems upright and firm
- leaves open and flat, not curling
- no glossy wet patches on leaves
- The surface stays clean, not fuzzy.
You may even notice the basil aroma when you hover your hand above the tray.
Light adjustments for stronger color
Once most seeds have sprouted, increase light. Low light encourages stretching, thin stems, and weak color.
Move gradually if using sunlight. A sudden shift into harsh midday sun can scorch or dry seedlings. A grow light is easier because it stays consistent.
Purple pigment responds to brightness. If you want a deeper purple, improving light is usually the first lever to pull.
Watering without losing trays
Purple basil likes steady moisture, but it hates waterlogging.
Safer watering habits:
- mist early, water gently later
- keep the surface moist, not muddy
- Avoid pouring heavy water straight onto stems.
- If seedlings fall at the base, reduce moisture slightly and increase airflow.
A gentle fan in the room helps reduce stagnant humidity, but don’t blast the tray directly, or the surface will dry too fast.
Harvesting purple basil microgreens
When to harvest for flavor and color
Harvest when stems are sturdy and the first true leaves begin to show. The tray should look like a dense mini forest and smell clearly like basil.
Too early means lighter flavor. Too late means tougher stems and more “seedling” texture. The sweet spot is when they still feel tender but look full and vibrant.
How to cut cleanly
Use sharp scissors or a clean knife. Hold a small section upright and cut just above the growing medium. Don’t pull. Pulling the soil into your harvest.
A crisp cut keeps greens fresher longer and prevents bruising.
Storage and best use
Purple basil microgreens taste best fresh. If storing:
- keep them dry
- Store in a container with a paper towel
- refrigerate and use within a few days
- Avoid the coldest back wall of the fridge
If you see slime, a sour smell, or dark, wet patches, discard.
Propagation for a constant basil supply
How mature purple basil behaves
If you let some plants grow past the microgreen stage, stems thicken and turn woody near the base. Plants become upright and flower heavily.
Some purple basil types don’t give easy seed harvest, or the seed may be inconsistent. In those cases, cuttings are the smarter long-term strategy.
Taking cuttings the right way
Choose medium young stems. Very soft tips wilt fast, and very old woody stems can root slowly.
Steps:
- cut cleanly near a node
- remove flowers and flower spikes
- Keep a few top leaves, strip lower leaves
- aim for at least three nodes that can sit below the surface
From one mature plant, you can often take dozens of cuttings if it’s well-branched.
Rooting cuttings
Stick cuttings into a moist, airy medium in a propagation box. Keep humidity high with a loose cover or plastic sheet, and keep light gentle, not harsh.
Once cuttings root and start new growth, you’ve created your own living seed bank. This makes it easy to keep basil going while still sowing microgreen trays on a schedule.
Easy recipes using purple basil microgreens
Purple basil microgreen pesto
Blend nuts, garlic, olive oil, grated cheese, and a big handful of microgreens with a few mature leaves if you have them. Add salt and thin with more oil or a splash of pasta water.
Microgreens blend smoothly and keep pesto tasting bright, not heavy.
Tomato toast with purple basil microgreens
Toast bread, add ripe tomato slices, olive oil, salt, then finish with a generous pinch of microgreens. Add soft cheese or avocado if you want it to be filling. The flavor cuts through the tomato sweetness beautifully.
Creamy pasta finish
Make a simple garlic cream sauce, then remove from heat and stir in a handful of microgreens right at the end. Top with extra microgreens when plating. The heat softens them slightly without destroying the aroma.
Citrus salad
Combine greens with orange segments and a simple citrus olive oil dressing. Fold in microgreens just before serving. The clove-like note plays surprisingly well with bright citrus.
Growing rhythm and practical tips
Stagger sowing for steady harvests.
If you want purple basil microgreens often, sow small trays regularly. Starting a tray every 7 to 10 days keeps harvests coming without overwhelming you.
Because germination can range from 5 to 14 days, consistency in warmth and moisture is what keeps your schedule predictable.
Pair trays with propagated plants
Keep a few mature purple basil plants in pots. Use them for cuttings and occasional full leaves, while trays provide quick microgreen harvests. The two methods support each other.
Keep it stable through the seasons.
Warm months in the 25 to 30°C range make basil easy. Cooler periods may need indoor warmth and steady light. Protect young trees from heavy rain, harsh sun, and sudden drying winds. Regular pruning keeps mature plants productive instead of tall and bare.